

March 2, 2026
⯀
18
min


Building scalable iOS apps requires careful planning in both technical performance and code architecture. Here's how Swift helps:
Swift combines speed, safety, and modern tools, making it the ideal choice for creating apps that can handle growth without sacrificing performance or maintainability. Below, we’ll dive into strategies to optimize concurrency, modularize architecture, and manage shared state effectively.

Optimizing concurrency is essential for keeping your app fast and responsive as user demand increases. Swift's concurrency model moves away from outdated callbacks, offering tools that improve both performance and code readability. With the introduction of async/await, actors, and task groups, Swift has officially shifted from Grand Central Dispatch (GCD) to a more modern standard for handling concurrency in iOS apps as of 2026. This transition is helping engineering teams deliver faster user experiences, reduce crashes, and lower maintenance efforts.
The benefits are impressive. By adopting Swift Concurrency, you can simplify your codebase by up to 80% compared to GCD-heavy architectures. For enterprise environments, a phased migration to Swift Concurrency can minimize migration risks by 60–70%. These improvements are largely due to Swift's cooperative thread pool, which avoids the thread overload issues sometimes caused by GCD. Let’s dive into how async/await makes asynchronous programming more intuitive.
Async/await transforms complex, nested callbacks into a straightforward, linear flow. Instead of the infamous "pyramid of doom", your code pauses at each await point, freeing up the thread for other tasks rather than blocking it.
Swift takes safety seriously. The compiler performs checks during build time, catching unhandled errors and potential data races before they turn into runtime issues. To get the most out of this, enable "Strict Concurrency Checking" in your Build Settings (set to "Complete") to spot data race issues during development.
For parallel tasks, you can use async let to execute them concurrently. For instance, two tasks that would normally take 10 seconds when run sequentially can be completed in just 5 seconds when executed in parallel using async let. If you’re working with older, callback-based APIs, you can integrate them with async/await by wrapping them in withCheckedContinuation.
Once your asynchronous code is streamlined, actors step in to ensure thread safety. They solve the challenge of managing shared mutable state by creating an isolation boundary where only one task can access an actor's internal state at a time.
"An actor provides absolute, compiler-guaranteed data isolation."
– CosmicLearn
Think of an actor as a class with a built-in serial dispatch queue. It processes incoming tasks one at a time, ensuring no two tasks modify the same data simultaneously. Interacting with an actor requires the await keyword, signaling that execution may pause if the actor is busy.
However, be cautious of actor reentrancy. When an await is encountered inside an actor, the execution suspends, and the actor may handle other tasks in the meantime. This means you should double-check any assumptions about the state once execution resumes. For scenarios like image caching, storing the ongoing Task within the actor allows multiple callers to wait for the same result without duplicating effort.
For read-only properties or methods that don’t touch mutable state - like constants or independent calculations - you can use the nonisolated keyword. This allows faster, synchronous access without the overhead of await.
Task groups are perfect for managing a large or unpredictable number of concurrent tasks, such as processing batches of images or handling multiple API calls simultaneously. You can create them using withTaskGroup or withThrowingTaskGroup (if tasks might fail), and add tasks dynamically with the addTask method.
In one test, running tasks concurrently on three CPU cores reduced execution time from 9.6 seconds to just 5.17 seconds. Swift's cooperative thread pool ensures efficiency by running tasks on a limited number of threads optimized for the hardware, even when managing thousands of tasks.
"Task groups offer more flexibility than async let without giving up the simplicity of structured concurrency."
– Andy Ibanez
For large task batches, you can use a "max concurrency" pattern. Start with a fixed number of tasks (e.g., 10) and only add new ones as others finish. This prevents excessive memory usage from launching too many tasks at once. Additionally, addTaskUnlessCancelled ensures no new tasks start if the group has already been cancelled.
Task groups also conform to the AsyncSequence protocol, enabling you to iterate over results as tasks complete using a for await loop. Structured concurrency ensures that child tasks are automatically cancelled if the parent task is terminated. For long-running, CPU-heavy operations, calling await Task.yield() periodically prevents blocking threads and keeps other tasks moving forward.
Once you've optimized concurrency for performance, the next step in managing a growing app is to structure your code into modular components. This approach helps tackle complexity as your app scales, while also making testing, deployment, and future updates more efficient. By dividing your codebase into smaller, independent modules, you can develop, test, and update each piece separately. Instead of bundling everything into one massive target, modular architecture organizes features into self-contained packages. This becomes especially important as your project grows - over 73% of mobile developers report struggling with codebases that are too complex to manage effectively.
The advantages are clear. Monolithic projects often suffer from painfully long build times - sometimes exceeding 10 minutes. Modular projects, on the other hand, rebuild only the modules that have been changed. For instance, in June 2025, iOS Engineer Karan Pal showcased how restructuring a sprawling iOS project into modular components using Swift Package Manager significantly improved testability and slashed build times that had previously caused delays. This modular setup also complements Swift's concurrency tools, enabling teams to work on different parts of the app in parallel.
Breaking an app into modules fundamentally changes how teams collaborate on large projects. Imagine features like Login, Payments, and Search being housed in separate modules - this setup allows multiple engineers to work on different features simultaneously without interfering with each other's work. Merge conflicts become less frequent, as each team focuses on its own module, and testing speeds up because you can run targeted tests on individual modules instead of testing the entire app.
"Feature implementations exist in isolation from one another and can be added, removed, or replaced with relative ease."
– Vladimir Kolbas, Engineering Manager, DECODE
Swift's access control system (public, internal, open) enforces clear boundaries between modules. By default, code is internal to its module, meaning it’s hidden from other modules unless explicitly marked as public. This reduces the risk of accidental tight coupling and encourages intentional interface design. In August 2023, Vladimir Kolbas, an Engineering Manager at DECODE, applied a "modular monolith" strategy to an iOS project. The architecture included a "Core" package for networking and storage, a "CoreUI" package for reusable UI components, and feature-specific modules. This setup allowed the team to maintain a single source of truth for UI elements while keeping business logic isolated within individual features.
Swift Package Manager (SPM) makes modularization seamless, eliminating the need for third-party tools. You can create a new package directly in Xcode (File > New > Package) or through the terminal with swift package init --name [ModuleName]. SPM simplifies the process by allowing you to define modules, dependencies, and targets in one manifest file, creating clear separation between Core, Shared, and Feature components.
To keep things organized, consider structuring your modules into the following layers:
Avoid circular dependencies by using "Interface Modules", which house only protocols. This lets modules interact through abstractions rather than concrete implementations, maintaining flexibility and reducing coupling.
When working with resources like images or localization files, keep them within their respective modules and access them using Bundle.module. To integrate these packages into your app, add them under "Frameworks, Libraries, and Embedded Content" in your target settings. For better performance, use static libraries instead of dynamic frameworks - SPM defaults to static linking, which combines the module into your app binary during compilation, avoiding runtime overhead.
With modular dependencies in place, the next step is choosing a design pattern that supports scalable architecture.
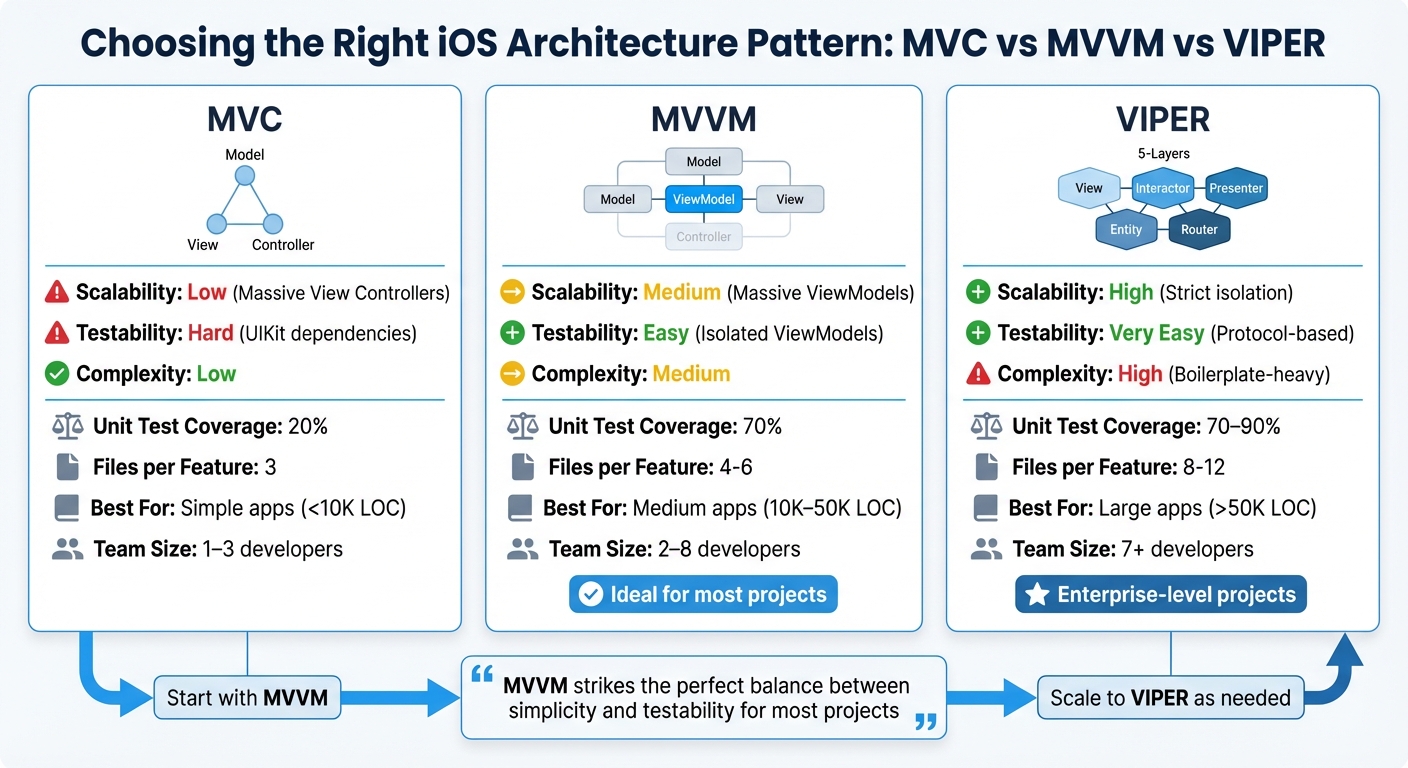
MVC vs MVVM vs VIPER Architecture Patterns Comparison for iOS Apps
Once you've set up a modular structure, the next step is to pick a design pattern that aligns with your app's growth. The wrong choice can make your code bloated and hard to manage, while the right one ensures your app remains maintainable as it expands. A good design pattern complements your modular architecture and supports scalability.
The three most common patterns - MVC, MVVM, and VIPER - differ in how they handle complexity and testing.
@Published property wrappers.Switching from MVC to MVVM can boost unit test coverage from 20% to 70%, while VIPER can push it even higher to 70–90%. However, VIPER comes with complexity - each feature might require 8–12 files compared to MVC's 3.
| Feature | MVC | MVVM | VIPER |
|---|---|---|---|
| Scalability | Low (Massive View Controllers) | Medium (Massive ViewModels) | High (Strict isolation) |
| Testability | Hard (UIKit dependencies) | Easy (Isolated ViewModels) | Very Easy (Protocol-based) |
| Complexity | Low | Medium | High (Boilerplate-heavy) |
| Best For | Simple apps (<10K LOC) | Medium apps (10K–50K LOC) | Large apps (>50K LOC) |
| Team Size | 1–3 developers | 2–8 developers | 7+ developers |
The takeaway? MVVM is ideal for medium-sized apps with teams of 2–8 developers, while VIPER is better suited for larger teams or enterprise-level projects exceeding 50,000 lines of code.
MVVM fits naturally into a modular structure, simplifying data flow and testing. It strikes a balance between being easy to manage and easy to test, making it a great choice for most projects. Here's how it works:
Here’s a quick example:
// Model
struct User {
    let id: String
    let name: String
    let email: String
}

// ViewModel
@MainActor
class UserProfileViewModel: ObservableObject {
    @Published var userName: String = ""
    @Published var isLoading: Bool = false

    private let userService: UserServiceProtocol

    init(userService: UserServiceProtocol) {
        self.userService = userService
    }

    func fetchUser(id: String) async {
        isLoading = true
        do {
            let user = try await userService.getUser(id: id)
            userName = user.name
        } catch {
            userName = "Error loading user"
        }
        isLoading = false
    }
}

// View
struct UserProfileView: View {
    @StateObject var viewModel: UserProfileViewModel

    var body: some View {
        VStack {
            if viewModel.isLoading {
                ProgressView()
            } else {
                Text(viewModel.userName)
            }
        }
        .task {
            await viewModel.fetchUser(id: "123")
        }
    }
}
In this setup, the ViewModel uses dependency injection through a protocol (UserServiceProtocol), making it easy to replace with a mock for testing.
As your app grows, avoid letting ViewModels handle too much. Extract business logic into separate Use Cases or a Domain Layer to prevent ViewModels from ballooning into 500+ lines of code. Keep them focused on presentation logic.
VIPER shines in scenarios where multiple teams work on different features or when strict component isolation is necessary. Its five-layer structure - View, Interactor, Presenter, Entity, and Router - ensures clear boundaries, making it easier to develop, test, and deploy features independently.
"VIPER is a highly modular architecture that separates concerns into five layers... improving maintainability and testability."
– Baljit Kaur, iOS Developer
This approach is particularly useful for apps with a lifespan of 5+ years or projects requiring reusable components across platforms. However, VIPER is not without its downsides. iOS architect Matteo Manferdini cautions against its use in smaller projects:
"VIPER is extremely prescriptive, forcing unnecessary abstractions and filling your code with boilerplate. It causes a high degree of indirection that is tedious to implement and hard to follow".
For smaller apps or prototypes with fewer than 5–10 screens, VIPER can be overkill. The additional boilerplate slows down development without offering significant benefits. If you're unsure, start with MVVM and gradually adopt VIPER for specific, complex modules as your app grows. This way, you can introduce structure where it’s needed without over-engineering from the start.
After selecting a design pattern, the next hurdle is managing shared state efficiently without running into data races or UI freezes. Smooth state management ensures your app remains responsive, even under heavy usage. Swift's modern concurrency tools are a game-changer here, offering safer and cleaner ways to handle state and UI updates.
Actors are a powerful tool to prevent data races by allowing only one task to access their internal state at a time. Unlike traditional methods like manual locks or dispatch queues, actors provide thread isolation that's enforced by the compiler. This means threading issues are flagged during development, not at runtime. They're perfect for handling shared resources like caches, network managers, or user session data.
The @MainActor attribute is another essential tool, ensuring specific code always runs on the main thread. This is especially important for UI updates, replacing the older DispatchQueue.main.async pattern with a cleaner, type-safe approach. You can apply @MainActor at various levels - class, method, or property - based on your needs. For instance, marking an entire ViewModel with @MainActor ensures all UI-related properties and methods stay on the main thread, while background tasks handle non-UI work elsewhere.
"MainActor should protect your UI - not imprison your app." – Debdut Saha
However, it's crucial to use @MainActor wisely. Avoid applying it to entire service or repository classes, as this can create bottlenecks. Instead, focus its usage on ViewModels and UI components. For smaller, specific UI updates from background contexts, you can wrap those updates in MainActor.run { ... }.
| Feature | Grand Central Dispatch (GCD) | Swift Concurrency (Actors/MainActor) |
|---|---|---|
| Safety | Manual (Runtime warnings) | Compiler-enforced (Compile-time errors) |
| Complexity | High (Callback hell/Nested closures) | Low (Linear async/await flow) |
| State Protection | Manual locks/Serial queues | Automatic Actor isolation |
| UI Updates | DispatchQueue.main.async |
@MainActor |
By using Swift Concurrency, you can simplify your code significantly - reducing complexity by up to 80% compared to older GCD methods. Additionally, implementing actor boundaries can lower technical risks in large-scale projects by 60% to 70%. With state management in place, the next step involves integrating cloud backends for real-time data synchronization.
Real-time data synchronization is no longer optional; users expect instant updates across their devices. WebSockets are a great solution for this, maintaining a persistent, two-way TCP connection that allows servers to push updates to clients immediately. Libraries like Socket.io make implementation easier by handling reconnections, fallback mechanisms like HTTP Long Polling, and message broadcasting to specific user groups.
When scaling horizontally, tools like Redis Pub/Sub adapters and sticky-session load balancers (using IP hash routing) ensure every user receives real-time updates reliably.
"Real-time functionality is no longer a luxury - it's an expectation." – Muhammad Arslan, Senior Full Stack Developer
For UI updates, ensure all data from cloud backends is funneled through @MainActor to prevent crashes or freezes. However, keep heavy tasks like network calls and JSON parsing off the main thread to avoid laggy interfaces. For large-scale apps, batching and coalescing requests can reduce server strain and improve battery life.
An Optimistic UI approach can further enhance the user experience. This method updates the interface immediately while a request is in progress, rolling back only if the server rejects the update. For critical operations, use callback patterns in WebSocket events to confirm when the server has successfully processed a write.
Efficient input handling is key to maintaining performance, especially for rapid interactions like typing or sliding. Without proper management, these actions can trigger excessive events, leading to CPU spikes, UI stutters, or redundant network calls. Debouncing solves this by delaying action until input stabilizes, cutting down on unnecessary processing.
"Debouncing simply means that you don't start the task immediately and wait for some amount of time... It allows us to eliminate unnecessary work for intermediate data and run only for final data." – Majid Jabrayilov
In Swift, debouncing can be implemented using Task.sleep within a task tied to an identifier. If the identifier changes due to new input, the previous task is canceled automatically. The Task.sleep function throws a CancellationError, stopping unnecessary operations in their tracks. In SwiftUI, you can achieve this with the .task(id: query) modifier, adding a short delay like try await Task.sleep(for: .seconds(0.5)). For Combine-based code, the .debounce operator on @Published properties is a great way to delay value emissions to subscribers.
Modernizing legacy iOS projects can feel daunting, but the Strangler Fig Pattern offers a practical way forward. Instead of rewriting your app from scratch, this method encourages replacing outdated features step by step. Why is this important? Because complete rewrites are often underestimated, with complexity misjudged by 300% to 400%. Incremental migration ensures your app remains functional while becoming more scalable and maintainable with Swift.
"Any time you engage in a big bang modernization effort, you are taking a huge risk, and the odds are not in your favor." – Chris Richardson, Author of Microservices Patterns
Start by enabling Strict Concurrency Checking in Xcode Build Settings. Set it to "Complete" to identify data races during compilation rather than in production. This simple adjustment highlights threading issues early, providing a clear roadmap for modernization. With concurrency checks in place, you can tackle specific areas of your codebase with confidence.
Networking code built on nested completion handlers can quickly become a nightmare to maintain. Swift's async/await simplifies this by allowing you to write sequential, easy-to-read code. To bridge the gap between old and new, use continuations.
For network requests that may fail (like URLSession), wrap completion handlers in async functions with withCheckedThrowingContinuation. This approach lets you use try await in new code without breaking existing functionality. During development, the "Checked" version helps catch bugs like double-resume errors. Once stable, you can switch to UnsafeContinuation for better performance.
"As a rule of thumb use CheckedContinuation during development then ship UnsafeContinuation." – Omar Elsayed, iOS Developer
For background work, replace DispatchQueue.global().async with Task { }. Similarly, swap DispatchGroup for TaskGroup or async let when running tasks in parallel. These changes reduce code complexity by about 80%, while adding benefits like automatic cancellation and error handling.
Thread-safety in legacy code often relies on NSLock or semaphores, which can lead to runtime issues. Swift's Actors provide a safer alternative by enforcing single-task access to mutable state at the compiler level. This eliminates race conditions before they even occur.
Begin by identifying shared resources like caches, network managers, or session handlers, and encapsulate them in actors. Be cautious about marking entire service classes as @MainActor, as this might unintentionally block the main thread with heavy tasks.
A key detail to remember: actors allow reentrancy, meaning state can change during an await suspension point. Always recheck local state after an await call to ensure data hasn't been modified by another task. Following this phased approach can lower migration risks by 60% to 70% in larger projects.
Once thread safety is addressed, you can shift your focus to optimizing ViewModels for improved performance and reduced boilerplate.
Updating ViewModels to align with modern patterns like MVVM or VIPER can significantly enhance scalability and ease of testing. For iOS 17 and later, consider replacing ObservableObject and @Published with the @Observable macro. This reduces boilerplate code and speeds up UI updates.
To make your ViewModels more flexible, use protocols (e.g., ViewModelProtocol) to decouple them from specific implementations. This makes testing simpler and allows you to swap out dependencies without overhauling the entire class. Mark ViewModels with @MainActor to ensure UI-related properties and methods run on the main thread. For heavy tasks, use background actors or Task.detached to avoid blocking the UI.
Introduce feature flags to roll out changes gradually. This allows you to test updates with a small user group in production and quickly revert if needed. To minimize performance overhead, batch background operations in a single TaskGroup. This reduces context switching between the main actor and background threads.
"The migration to async/await isn't just about replacing completion handlers - it's a fundamental shift in how we think about concurrency." – Sheldon Wang, Seasoned iOS Veteran
To build scalable iOS apps with Swift in 2026, it’s all about making smart architectural choices that stand the test of time. By using Swift's concurrency features, modularizing with Swift Package Manager, and applying design patterns like MVVM or VIPER, you can create a codebase that's both robust and adaptable.
Swift’s async/await and actor-based concurrency tools simplify your code while eliminating many runtime bugs. Pair this with a modular architecture, and your team can work faster, isolate features for independent testing, and cut down build times. Add design patterns like MVVM and VIPER into the mix, and you’ll maintain a clean, testable structure that’s easier to manage as your app grows. Modernizing legacy code with these approaches doesn’t just boost performance today - it helps future-proof your app.
The results? Fewer crashes, quicker updates, reduced maintenance costs, and better battery performance - benefits that appeal to startups and enterprises alike. But implementing these strategies takes careful planning and technical know-how. For teams aiming to modernize legacy apps or build scalable solutions from the ground up, working with specialists like Dots Mobile can make all the difference. Their services cover everything from UI/UX design and iOS development to backend integration and quality assurance, ensuring your app is built right the first time.
The decisions you make today will shape your app’s future. By adopting modern Swift practices, you can ensure your codebase is ready to meet tomorrow’s challenges.
When you need to kick off a set number of concurrent tasks that are predetermined at compile time, async let is your go-to. For instance, if you're fetching several pieces of data simultaneously, this approach works perfectly. However, when dealing with a dynamic or unpredictable number of tasks - like processing items in an array - task groups are the better option. They let you create tasks dynamically and handle their results as they finish, making them perfect for workloads that require more flexibility.
To break down an iOS app into modules using Swift Package Manager (SPM), start by creating individual Swift packages for each module. Each package needs its own Package.swift file, which specifies the module's name, dependencies, and targets. Once the packages are ready, add them to your Xcode project through the Swift Packages section and link them as required.
This method helps streamline your app's structure, making it easier to scale, manage, and reuse code across different projects.
When deciding between MVVM and VIPER, it’s essential to consider the complexity of your project and your team’s objectives.
MVVM (Model-View-ViewModel) is a straightforward approach that emphasizes clear separation of concerns. It pairs especially well with SwiftUI, making it a great choice for projects where faster development and easier maintenance are priorities.
On the other hand, VIPER (View-Interactor-Presenter-Entity-Router) introduces a more modular architecture. This makes it ideal for large-scale applications that demand strict division of responsibilities and the ability to scale effectively. However, this comes at the cost of increased complexity.
Ultimately, the decision should align with your app’s size and your team’s experience with these patterns.


